


Since most household wiring is concealed behind walls and ceilings, it can be challenging to address faulty outlets, plan home renovations, or simply decipher the layout of your home's electrical circuits.
In this article, we will explore why it is essential to trace electrical wiring, the tools available for doing so, and how technologies—such as thermal imaging—can assist you in locating and diagnosing hidden wiring issues.
Why Trace Home Electrical Wiring?
When your electrical system malfunctions—manifesting as flickering lights, dead outlets, or frequently tripping circuit breakers—troubleshooting becomes a mere guessing game if you lack an understanding of your home's wiring connections.
By tracing your home's electrical wiring, you can map out the flow of your circuits, identify potential hazards, and ensure the safe operation of your power system. This enables you to detect risks sooner, streamline the repair process, plan system upgrades more effectively, and ultimately reduce costs.
What Tools Can You Use to Trace Home Electrical Wiring?
When tracing household electrical wiring, selecting the right tools allows you to work more safely and efficiently. The following are tools suitable for routinely detecting concealed wiring and potential faults:
- Voltage Tester: Used to check for the presence of voltage. Non-contact voltage testers are particularly safe and easy to use, making them ideal for performing quick preliminary checks before touching electrical components.
- Circuit Breaker Finder (Circuit Tracer): Helps you identify which circuit breaker controls a specific outlet or light fixture. This tool is especially useful in homes where the labels on the electrical panel are unclear, allowing you to quickly isolate a circuit without the need for trial-and-error.
- Multimeter: A versatile tool capable of measuring voltage, current, and resistance. It provides more detailed diagnostic information, helping you more accurately detect issues such as voltage drops, faulty outlets, or damaged wiring.
- Wire Tracer / Audio Signal Generator: By sending a signal through a wire, this device allows you to trace the wire's path behind walls or ceilings. It is useful for locating wires that are hidden or whose routing is unknown.
- Stud Finder with AC Detection: Detects live wires located behind drywall, helping you avoid accidental damage when drilling or performing installations. While not highly precise, it serves as a convenient tool for basic safety checks.
- Thermal Camera: Detects temperature differences caused by electrical current flow, helping you identify hidden faults, overloaded circuits, loose connections, or abnormal heating patterns.

Can Thermal Cameras Trace Electrical Wiring in a Home?
No, thermal imagers cannot "see" wires directly through walls in the same way that X-rays can; however, they are capable of detecting temperature differences generated by electrical currents. When wires are under load—or when faults such as loose connections or overloads are present—they generate heat, which becomes visible.
By detecting thermal distribution patterns, a thermal imager allows you to indirectly trace wiring paths or identify fault zones. It is recommended that inspections be conducted while the electrical circuit is energized and operational.
How Does a Thermal Camera Trace Electrical Wiring?
While a thermal camera cannot directly "see" electrical wires, it can assist you in tracing their routing by detecting the heat distribution patterns generated by electrical activity. Here is how a thermal camera works:
Detecting Heat Generated by Current
When electric current flows through a wire—or when a circuit is under load—electrical resistance naturally generates heat. A thermal imager is capable of capturing these subtle temperature differences, helping you identify areas where current is flowing.
Highlighting Surface Temperature Variations
Since electrical wires are typically concealed within walls, the heat they generate is conducted into the surrounding materials (such as drywall or insulation). This creates a thermal signature on the wall's surface, providing clues regarding the approximate path of the wires.
Revealing Abnormal Hotspots
Issues such as faulty connections, circuit overloads, or damaged wiring can cause localized temperatures to rise abnormally. These "hotspots" appear clearly in thermal images, enabling you to quickly pinpoint potential safety hazards or faults.
Most Effective When Circuits Are Active
Thermal imaging detection yields the most distinct results when current is flowing through the circuit. By switching on lighting fixtures or household appliances to increase the circuit load, you can boost heat generation, making the specific routing of the wires easier to identify.
Enabling Non-Contact Inspection
Using a thermal imager, you can scan walls, ceilings, and electrical distribution panels without the need for direct physical contact. This not only enhances operational safety but also eliminates the need for destructive methods—such as cutting into walls or dismantling components—to locate wiring.
What Are the Benefits of Using a Thermal Camera?
By using a thermal imager, you can gain faster, safer insight into the internal operational status of electrical systems—all without ever touching live components. This allows you to capture real-time temperature data and detect potential issues promptly.
- Non-Contact for Safer Inspection: You can scan walls, distribution boxes, and wiring without physical contact. This not only minimizes the risk of electric shock but also ensures greater safety when working with live circuits.
- Rapid Fault Detection: Thermal imagers instantly highlight abnormal hot spots, enabling you to quickly identify a wide range of issues—such as loose connections, overloaded wiring, or aging and failing components.
- Uncover Hidden Faults: Even when wiring is concealed within walls, a thermal imager can reveal potential hazards, allowing you to detect faults that are invisible to the naked eye.
- Save Time and Eliminate Blind Troubleshooting: There is no need to inspect every single outlet individually or tear open walls; simply by quickly pinpointing the specific area where a fault lies, you can significantly boost the efficiency of your troubleshooting process.
- Prevent Major Damage: By timely identifying signs of overheating or incipient failures, you can carry out immediate repairs before these issues escalate into equipment breakdowns, power outages, or serious safety hazards.

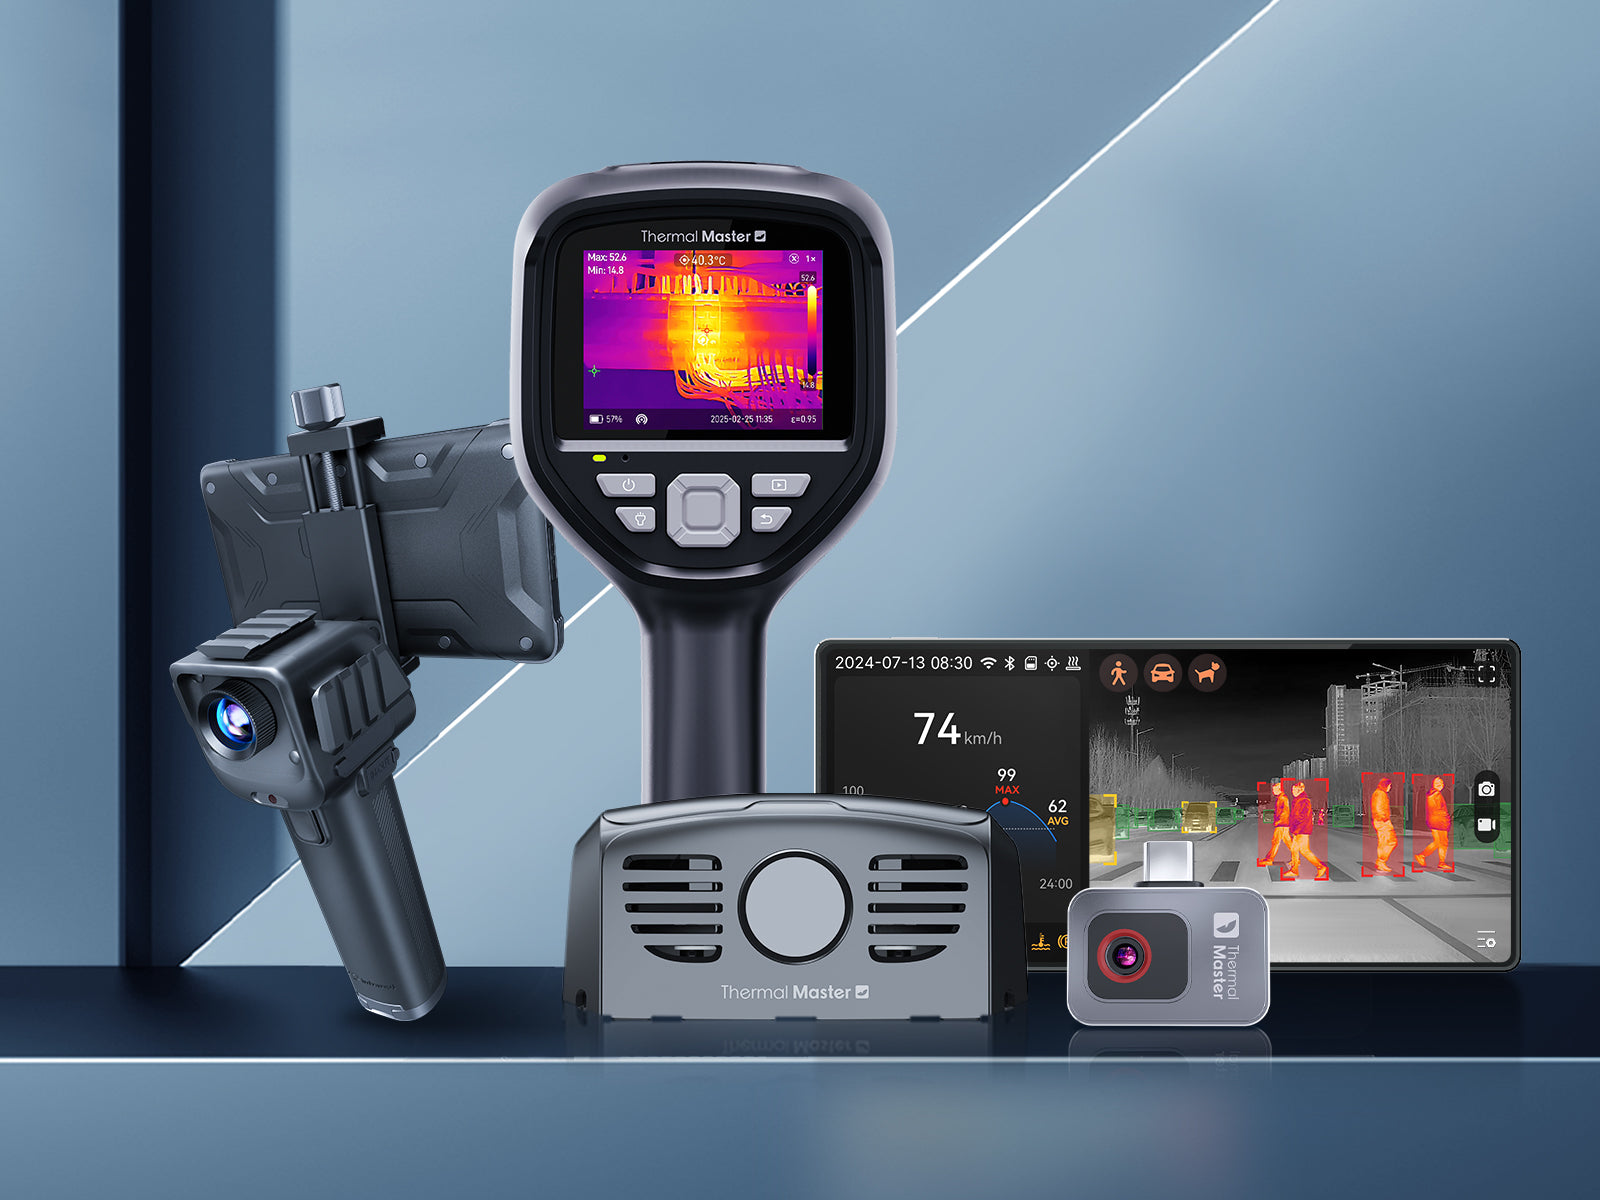
Which Thermal Cameras Are Best for Tracing Electrical Wiring?
When selecting a thermal imager for tracing home electrical wiring, the most critical factor is the depth of inspection you require—whether for a quick check, a detailed diagnosis, or a large-scale scan. To address this, Thermal Master offers three thermal imager models, each designed to meet a distinct level of application requirements.
1. Thermal Master P2 Pro
The Thermal Master P2 Pro features an infrared resolution of 256×192 (expandable to 512×384 via X³ technology) and a temperature measurement accuracy of ±2°C. It also comes equipped with a magnetic macro lens, allowing you to capture minute temperature variations at close range.
Furthermore, it supports 15x digital zoom and offers a wide temperature measurement range, making it ideal for routine home troubleshooting—such as inspecting power outlets, switches, and fine cabling components.
2. Thermal Master Thor001
The Thermal Master Thor001 delivers an infrared resolution of 256×192 (expandable to 512×384), a thermal sensitivity of ≤35mK, and a temperature measurement accuracy of ±1.5°C, enabling it to capture even the most subtle thermal fluctuations.
With an 8cm macro focus distance, it excels at diagnosing faults in terminal blocks, circuit boards, and intricate wiring. It is capable of performing in-depth diagnostics as well as quick scans to precisely pinpoint the location of issues.
3. Thermal Master Thor002
The Thermal Master Thor002 offers an enhanced resolution of 512×384, a sensitivity of ≤40mK, and a temperature measurement accuracy of ±2°C. With a minimum focus distance of 30cm, it is well-suited for conducting wall inspections and system-level diagnostics within the home environment.
It is also highly effective for tracing cable routing paths, analyzing circuit layouts, or rapidly identifying thermal anomalies within a space, helping you gain a comprehensive overview of the situation more quickly.
What Should You Keep in Mind When Tracing Household Wiring?
- Prioritize Safety: Avoid direct contact with exposed wires; ideally, cut off the power supply before conducting any inspections. If live testing is necessary, ensure you select and utilize appropriate protective tools.
- Understand Tool Limitations: For instance, thermal imagers can only visualize heat distribution patterns and cannot pinpoint the exact location of wires; therefore, exercise extreme caution when interpreting detection results.
- Ensure Circuits Are Active: Certain tools (such as thermal imagers) yield optimal results when current is flowing through the circuit. Activating the relevant equipment generates a clearer signal, thereby facilitating the detection process.
- Guard Against Misinterpretation: Reflected light, insulating materials, or external heat sources can all interfere with detection results. Consequently, it is essential to cross-verify your findings to ensure accuracy.
- Avoid Unnecessary Wall Damage: Before deciding to cut into or excavate a wall, utilize non-destructive testing methods first; this approach helps minimize guesswork and prevents avoidable damage.
- Know When to Seek Professional Assistance: If you encounter issues involving complex wiring configurations, recurring faults, or potential safety hazards, it is strongly recommended that you consult a licensed professional electrician rather than attempting to resolve the problem yourself.
Summary
As long as you select the right tools and understand the operating principles of electrical circuits, tracing home wiring becomes a much easier task. Although you cannot see the wires hidden behind the walls, tools such as voltage testers, circuit tracers, and thermal imagers can assist you in mapping out wiring paths and detecting potential hazards. This enables you to troubleshoot more efficiently and avoid causing damage.
FAQ
How to find a bad connection in house wiring?
Poor connections in home wiring typically manifest as flickering lights, overheating outlets, or tripped circuit breakers. You should first inspect the system for any loose or damaged connection points; then, use a multimeter to troubleshoot the issue, or employ a thermal camera to help pinpoint the exact location of the fault.
How do you detect live wires through walls?
You can use a non-contact voltage tester—or a stud finder equipped with an AC detection function—to detect live wires through a wall. Both devices are capable of sensing the electrical signals emitted by live wires and will sound an alarm when a live circuit is detected. To ensure accuracy, it is best to verify your findings using a second method.
Is it possible to identify a live wire without a tester?
It is impossible to make a reliable determination. Without proper testing tools, you might observe sparks, heat, or the normal operation of connected devices; however, these are merely indirect indicators, and relying on them to make a judgment is unsafe. The only method to identify a live wire that is both safe and accurate is to use specialized testing tools.
Related Reading:


Leave a comment
All comments are moderated before being published.
This site is protected by hCaptcha and the hCaptcha Privacy Policy and Terms of Service apply.